# Question Step
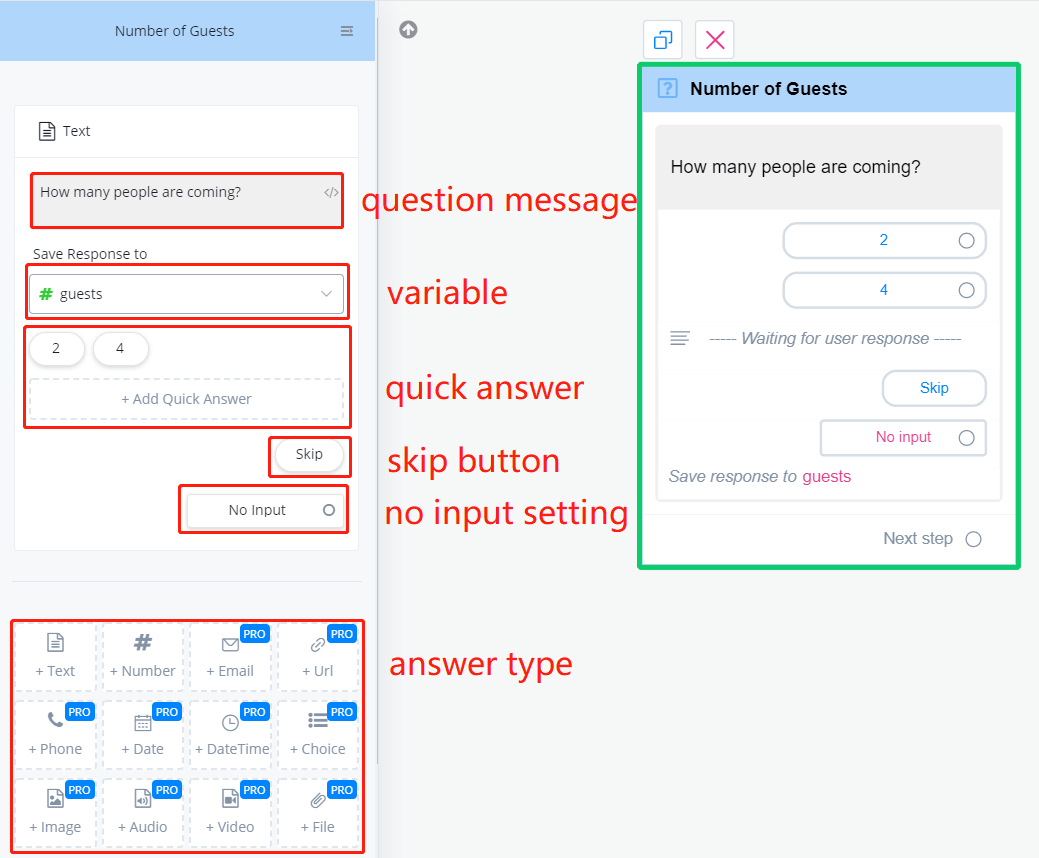
# Set Quick Answers
Quick answers are convenient for users to click rather than typing. When you set quick answer:
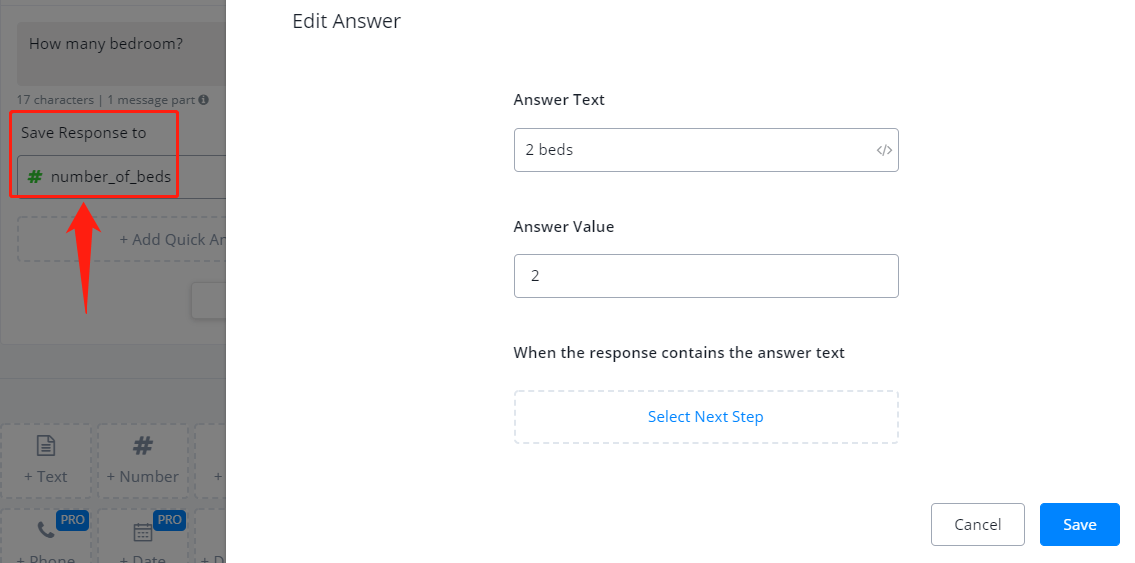
"Answer Text" is shown to users while "Answer Value" is saved to the variable.
TIP
You can set quick answers across all channels. However, some channels display the quick answers as buttons for pressing like Facebook, while some don't such as SMS. For the latter case, you can still set quick answers but at the same time, you will need to prompt that how to trigger the quick answers.
# How to give prompt and set quick answers?
In th question box, for example, put "reply 1 for service A, reply 2 for service B", etc. Then in the quick answer, set "Answer Text" to be "1", "2", etc for matching, and "Answer Value" to be "service A", "service B", etc to save user's option.
| Channel | How to Provide Quick Answers |
|---|---|
| quick answers will be displayed as buttons | |
| Telegram | quick answers will be displayed as buttons |
| use buttons instead of quick answer or give prompt | |
| quick answers will show in "Select Option" | |
| SMS | give prompt |
| Voice | give prompt and use Speech question or DTMF question to ask for keypad/voice input |
| quick answers will be displayed as buttons |
# How does the matching work in quick answers?
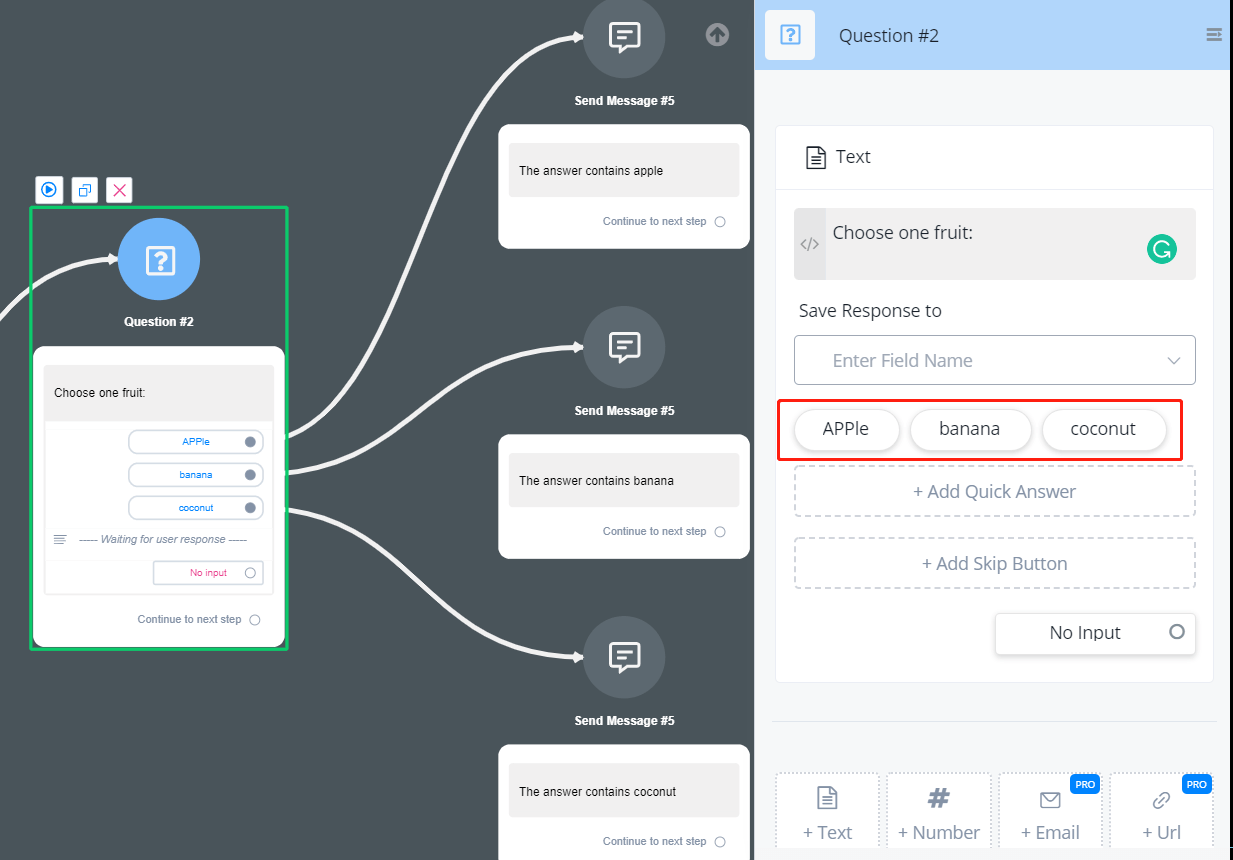
Once the user's input contains one of the "Answer Text", the quick answer is matched (non case-sensitive). Plus, the order of those quick answers matters because the bot will check in order. Once a quick answer matched, it will stop the matching.


# Skip Button
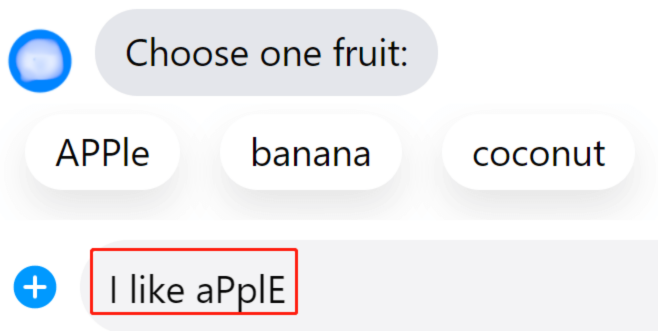
Add skip button if the question is ok to skip. Also, the label of the skip button is editable.
# No Match
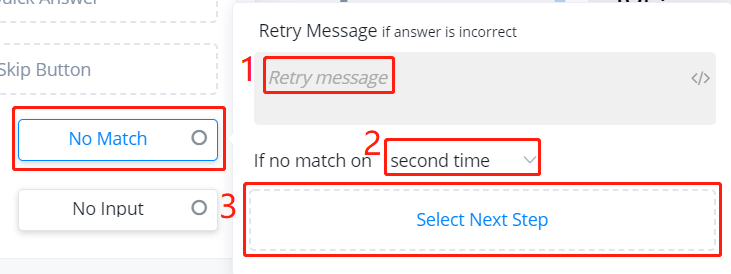
"No Match" is a very practical feature because different answer types have different specified patterns. Email address, for example, has to be "[email protected]". You can put something like "Wrong email, please try again" as your retry message and jump to another step if no match on several times.
However, a "[email protected]" format just filters out wrong email but fake email. To check whether an email is real or not, try Mini-App for using a third-party verification tool.
# No Input
Similarly, "No Input" helps you redirect the flow when user input expires. By default, a question expires in 1 hour. Make it shorter if needed.
# Ask for Image / Audio / Video / File / Record
Note
you will need text variables to save the URL links of these 5 types of answers
When the user uploads a document, an URL link pointing to the document is saved in the variable rather than the document itself. Because media document can be very large. Later, if you want to send that document in send message step, you will need to choose "Send Media From URL" and type in the variable there.
# Ask for Choice
This is a question type listing limited quick answers and user have to choose only from these quick answers. For example, when choosing property type, list only house, townhouse and apartment as quick answers. Therefore, if the user doesn't click one of these three, a retry message appears.
# Ask for Date / Datetime
Note that
Except from Facebook Messenger and Google My Business, the rest channel doesn't have a date picker when user makes Date/Datetime input. So you have to prompt users "Please input the Date / Datetime as exactly the format: YYYY-MM-DD / YYYY-MM-DD hh:mm:ss". Any other format won't be recognized successfully.
# Ask for Phone
The basic validation for Phone number Question is:
- only these 11 characters are allowed: 0, 1, 2, 3, 4, 5, 6, 7, 8, 9, +.
- "+" sign is only allowed in the front of the phone
- more than 6 characters
# Question Step in Voice Bot
TIP
You can always put a URL link pointing to your mp3 file in the text box (started with "https://" and ended with ".mp3" or ".mav") of a Send Message Step or Question Step. In that way, the bot will play the audio file instead of transferring the text to audio.
TIP
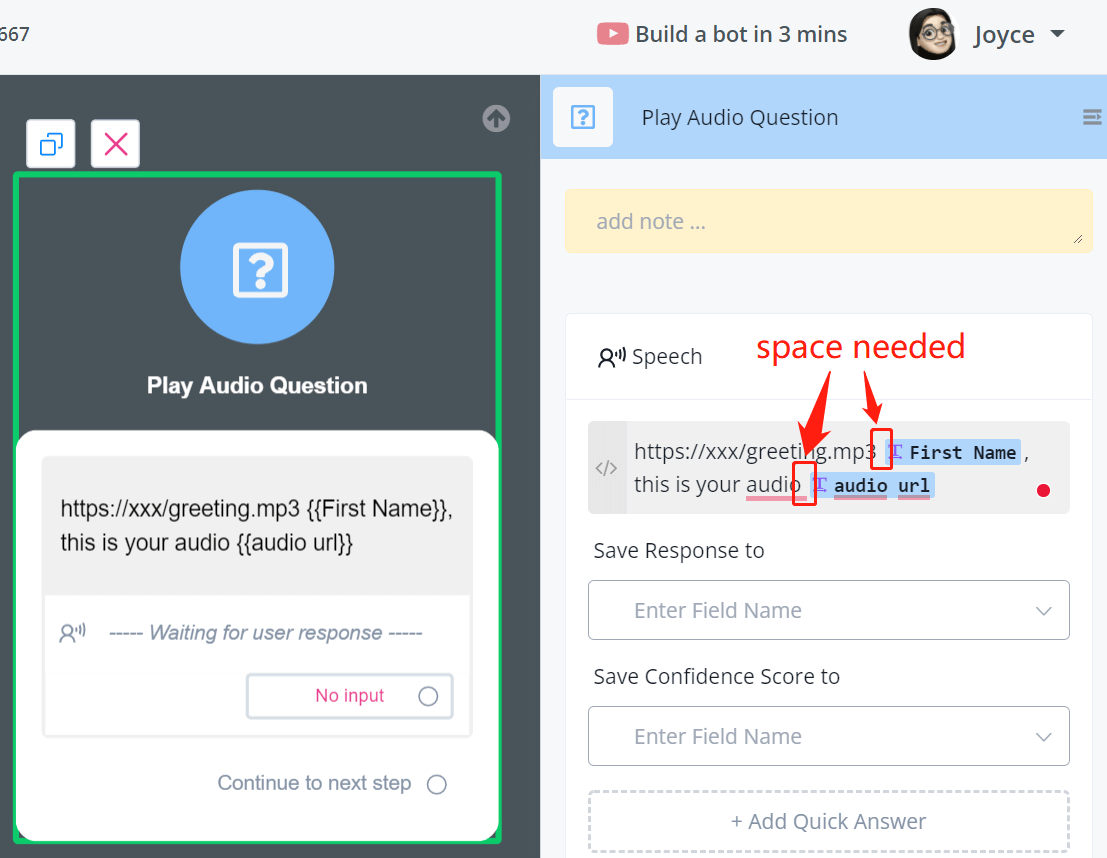
You can put the link directly in the text box or store the link in a text variable. You can also combine audio URL with text when you use it. But remember that don't let the URL and text connect to each other, because the system cannot recognize it as an audio URL link. See screenshot below.
# Voice Bot - Ask for Speech
Speech is usually used to get short answers. When the bot asks for speech input, it will listen to what the user says and convert the speech to text with a confidence score. The score is between 0 and 1. The closer to 1, the more confident the speech analysis was.
TIP
You might want to add a Condition step to discard any conversion with low confidence. For example, when the confidence score is less than 0.7, ask for re-input.
Use "Advanced Settings" to help improve the conversion:
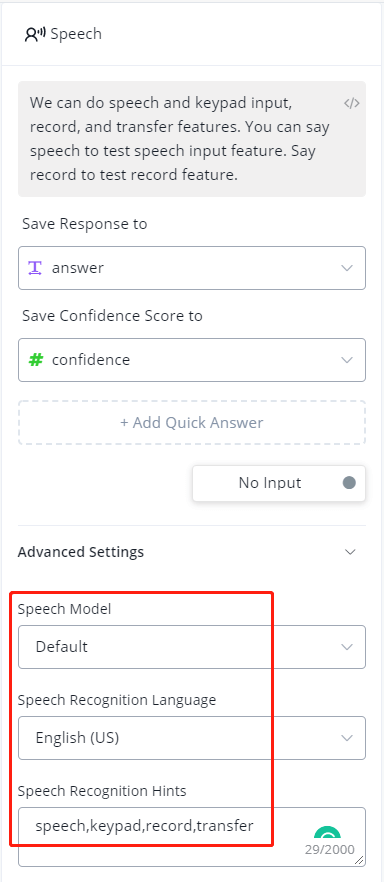
Select correspond speech model and language. "Numbers and Commands" speech mode can help improve the recognition rate when the answer is a string of numbers, etc. Please note that, Twilio charges for using this mode. More importantly, provide the bot with some hints, keywords that might appear in speech (separated by commas and no space).
# Voice Bot - Ask for DTMF (Keypad)
DTMF refers to keypad input, including number 0 to 9, * and #. Usually, it is used to make a main menu for your voice bot, just like what you might hear before "Hi, press 1 for xxx, press 2 for xxx, ..."
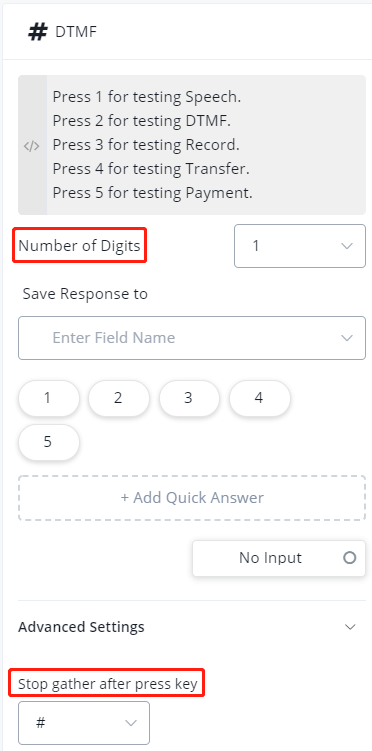
"Number of Digits" means how many digits to expect. For example, a credit card number needs 14 or 16 digits while a postcode needs 4 or 6 digits.
"Stop Key" is set to "#" by default, but it is also editable. You will need "Stop Key" when you don't know how many digits to expect. Don't forget to mention the "Stop Key" in the question box. 🤖🤖
TIP
"No Input" timeout in Voice Question plays an important role. Often, it will be set to just few seconds while in other channels, the default timeout is 1 hours.
# Voice Bot - Ask for Record
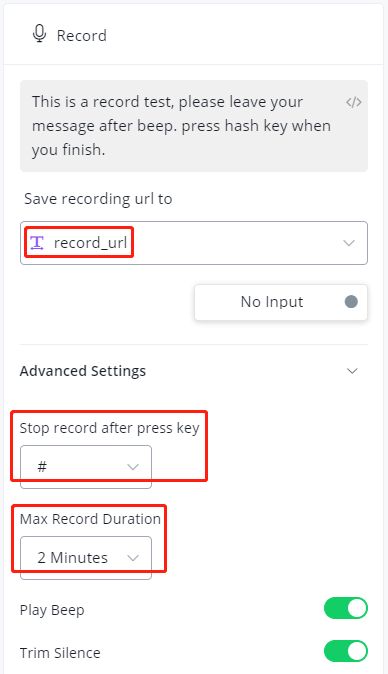
Again, same as asking for picture, audio, video or file, you will need a text variable to save the URL link of the record file. Check advanced settings for more details such as "Stop Key" and "Max Record Duration".
You will be able to access the record file through the URL link or manually from the "Recordings" section shown as below:
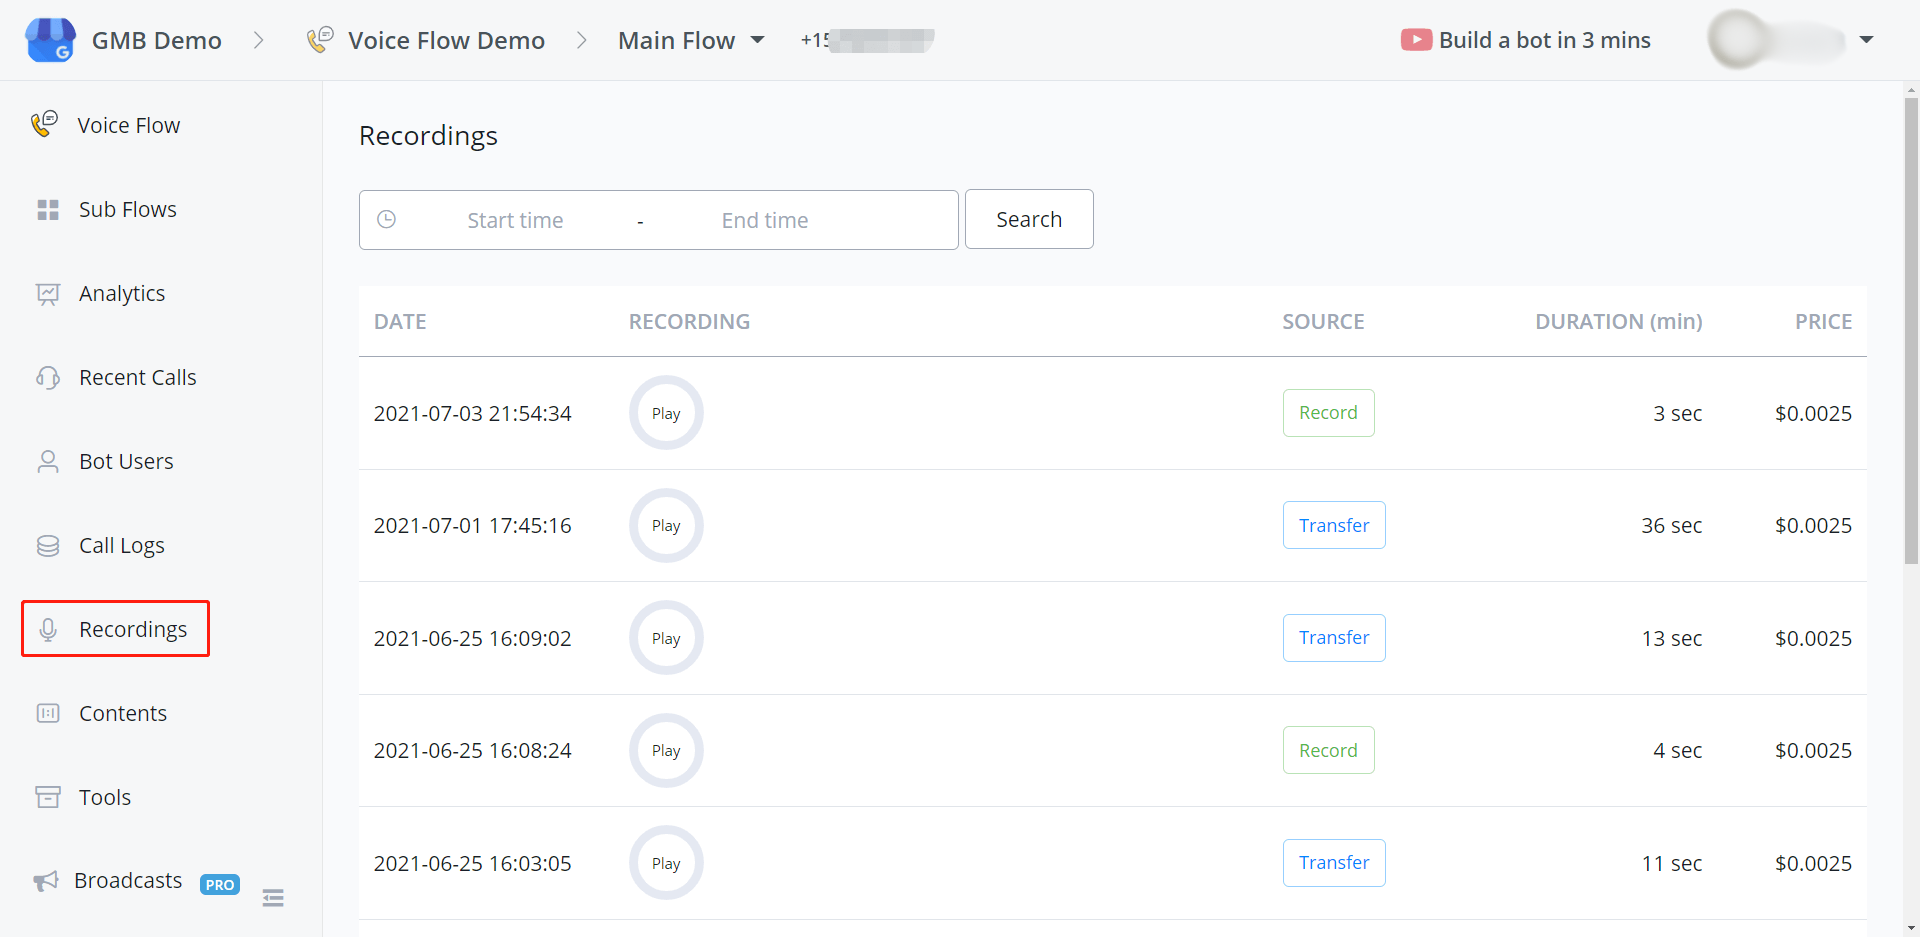
Here you can see all your "Record Question" and "Transfer" recordings with a "Play" button to play the audio.
# Voice Bot - Ask for Transfer
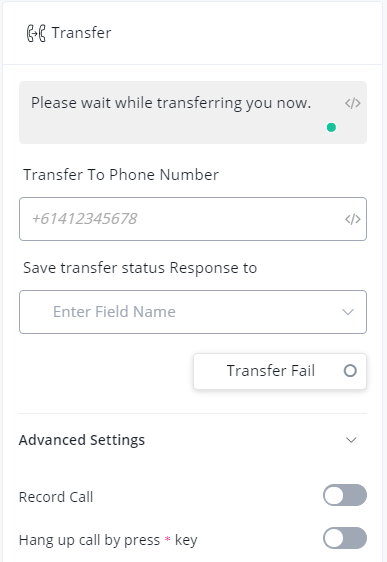
The transfer feature is more like an Action rather than a Question. Since actions in the Action step are shared across all the channels, we put transfers in Question steps.
TIP
The transfer number should be in E164 format. e.g. +61412345678
You can record the conversation after transferring for training purposes, etc. Similarly, check the recording from the "Recordings" section from the left sidebar.
# Hang up Calls
One thing to mention, if your clients need to come back to the bot after the transferred conversation. There are 2 ways to do so:
- the transferred party hang up first
- your clients press the star key (need to enable the option in advanced settings)
In either way, don't forget to mention it to your clients before the transfer.
# Add Extension to Phone Number
Add extension to a phone number by using a hash key. e.g. +61412345678#wwww1234. Each "w" will wait for half a second.
Let say I have a voice bot for the number +61412345678, and I put a DTMF question after the Start point of the main flow. The extension "1234" will be considered as the input for this DTMF question. In this way, you are routing the calls automatically.
# Transfer to Multiple Numbers
You can put multiple numbers in the "Transfer To Phone Number" field, separated by ONLY commas. e.g. +61412345678,+61412345679#wwww1234,+61412345670
The bot will call these 3 numbers simultaneously, the first person who answers the call get this transfer, the rest call stops ringing. Your phone number provider will only charge you for one call because only one number is transferred successfully.
# Voice Bot - Ask for Payment
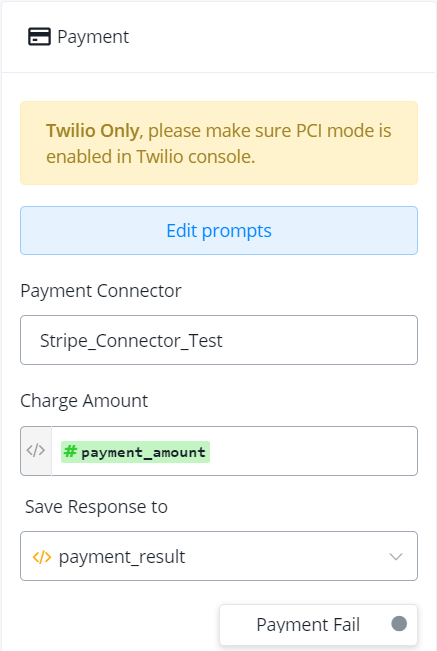
The payment feature is more like an Action rather than a Question.
# PCI Mode (Twilio)
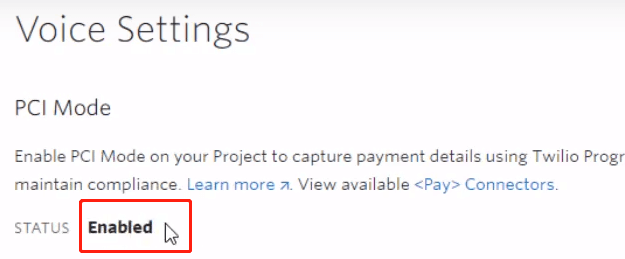
For Twilio users, you will need to enable the PCI mode in your Twilio account to capture a payment either in test or live mode.
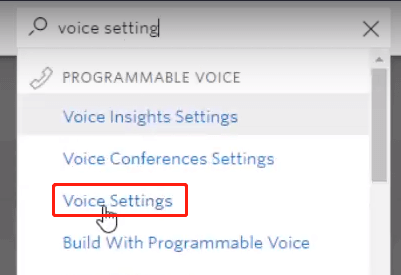
Search "Voice Settings" from your account,
click the "Enable" button:
# Edit Prompts
All prompts are already set in English. Feel free to change it if needed like changing to another language. There are 4 pieces of information to gather for a card.
- credit card number
- expiration date
- CVV
- postcode (if needed, enable the option in advanced settings).
Each information has 3 speeches to set, asking, timeout and invalid:
# Payment Connector
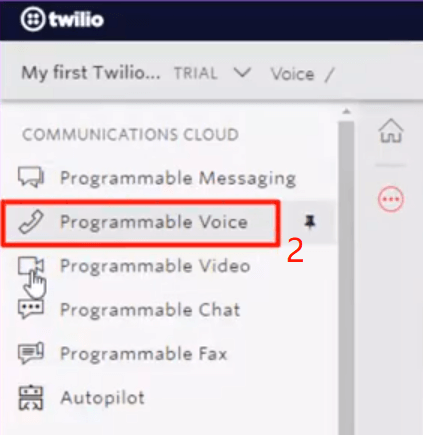
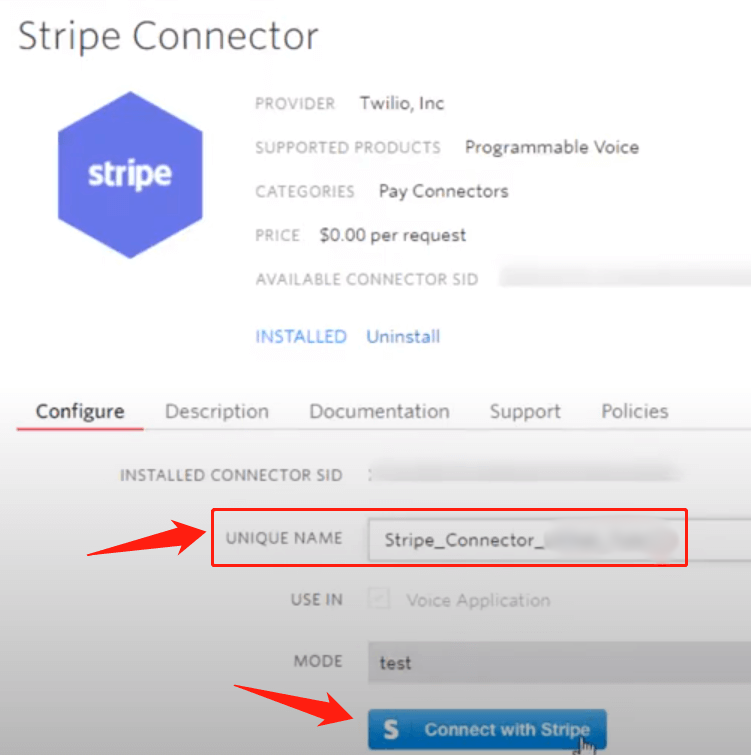
To get a "Payment Connector", which is "Unique connector ID", you will need to access your phone number provider and payment service provider. Twilio and Stripe, for example, go twilio.com (opens new window), follow step 1 to 4 in the following 2 pictures:
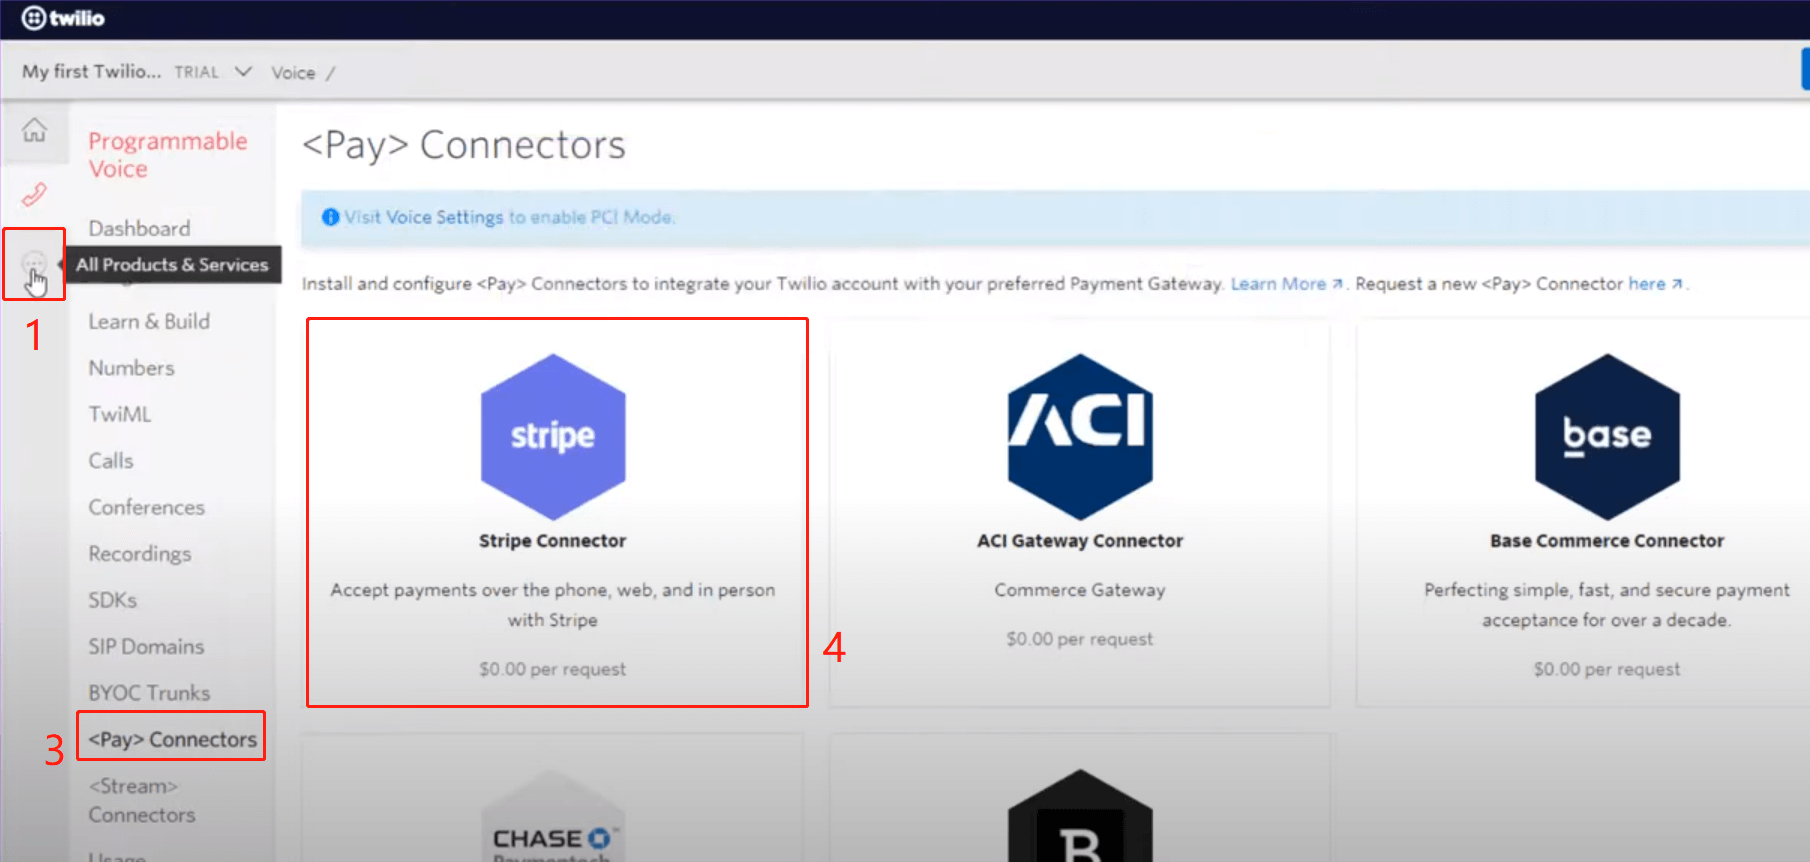
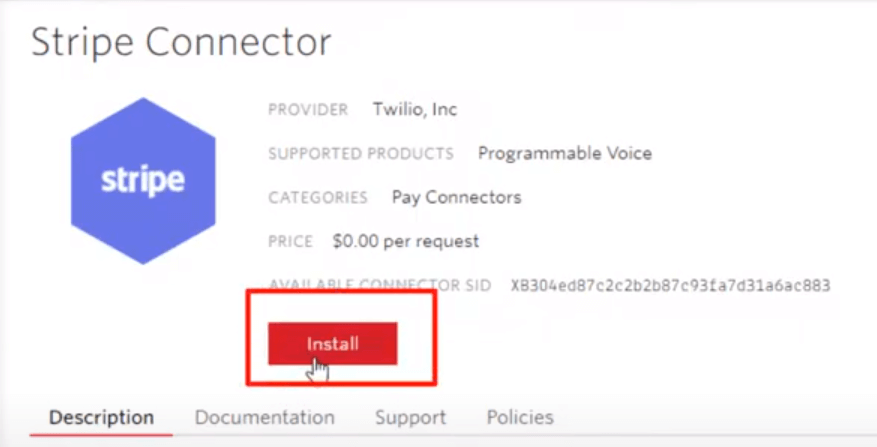
Install, name a "UNIQUE NAME" yourself and click "Connect with Stripe". This "UNIQUE NAME" is then your "Unique connector ID", copy it back to Smart ChatBot.
TIP
Note that for "MODE", choose "test" when you are testing the payment process and choose "live" when you are ready to accept real payment.
# Charge Amount
Put direct number like "99.99" or a number variable here.
# Response
You will need a JSON variable to hold the payment result. This is a response example including some card details, confirmation code and payment result.
# Payment Fail
You can deal with the situation via the "Payment Fail" option. For example, send "Something went wrong" and goto the Payment Step again.
# One Time Token
You can choose to capture a payment right now or later.
- If you decide to charge right away:
give a value more than 0 in the "Charge Amount" box
- If you wanted to get the payment later
put a "0" in the "Charge Amount" box. In this way, you will get a token for future capture.
Note
There are 2 types of token, one-time token and reusable token. With a one-time token, you can charge the client once. While with a reusable token, you can charge the client for multiple times.
Under the situation that you set the charge amount to "0", if you enable the "One Time Token" option in advanced settings, you will get a one-time token. Otherwise you get a reusable token.
By different combinations of charge amount and "One Time Token" option, you will get different payment results:
| Charge Amount | One Time Token | What Will Happen | Payment Result |
|---|---|---|---|
| 0 | Enabled | get one-time token | |
| > 0, e.g. 5 | Enabled | charge $5 | |
| 0 | Disabled | get reusable token | |
| > 0, e.g. 5 | Disabled | charge $5 |
That means, whenever you set a charge amount greater than 0, it doesn't matter whether you enable the One Time Token option or not, you will charge your client right away and get a payment confirmation code. The code starts with "ch_" if you are using Twilio.
On the other hand, an one-time token starts with "tok_" if you are using Twilio. And a reusable token refers to customer's ID, starting with "cus_" if you are using Stripe.
# How to Charge with Token
Check the documentation of how to create a charge with your payment service provider. Let's take Stipe as an example, to make a payment with a reusable token.
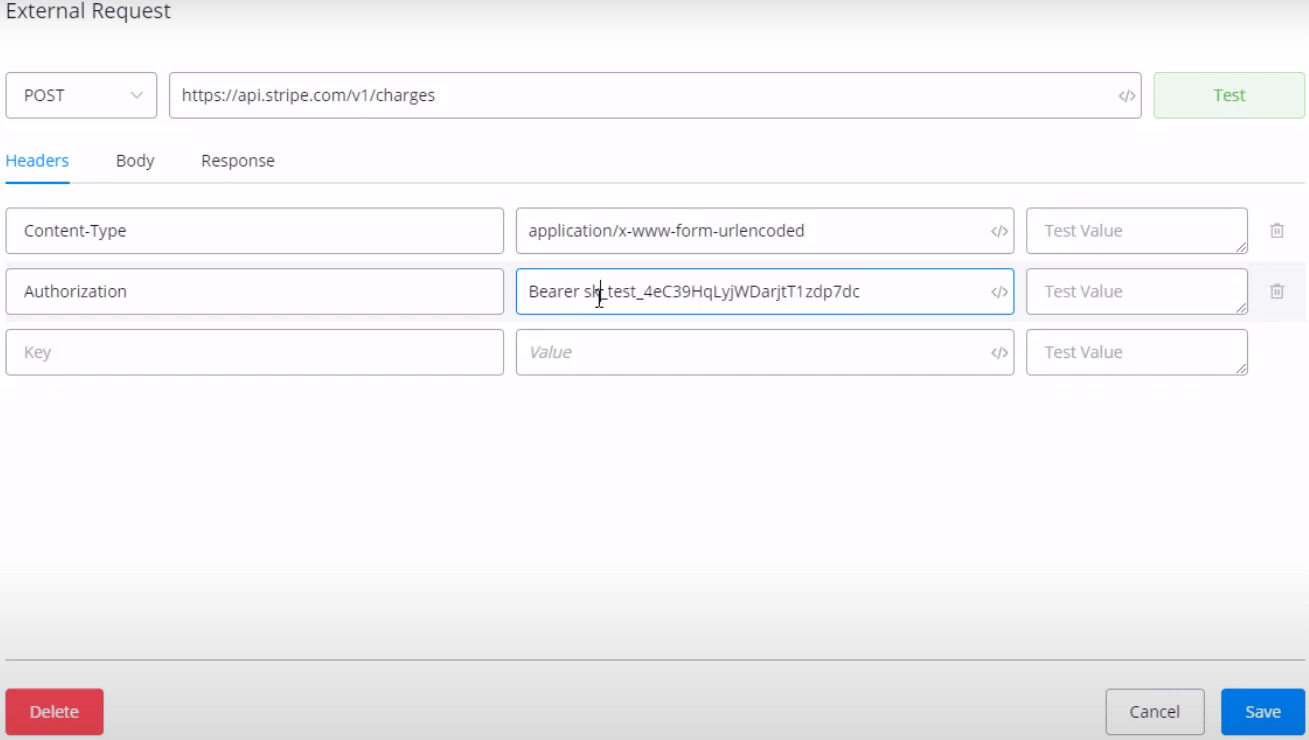
In the example, a post request is sent to Stripe with a testing API key and a charge amount, currency and the reusable token, i.e. the customer ID.
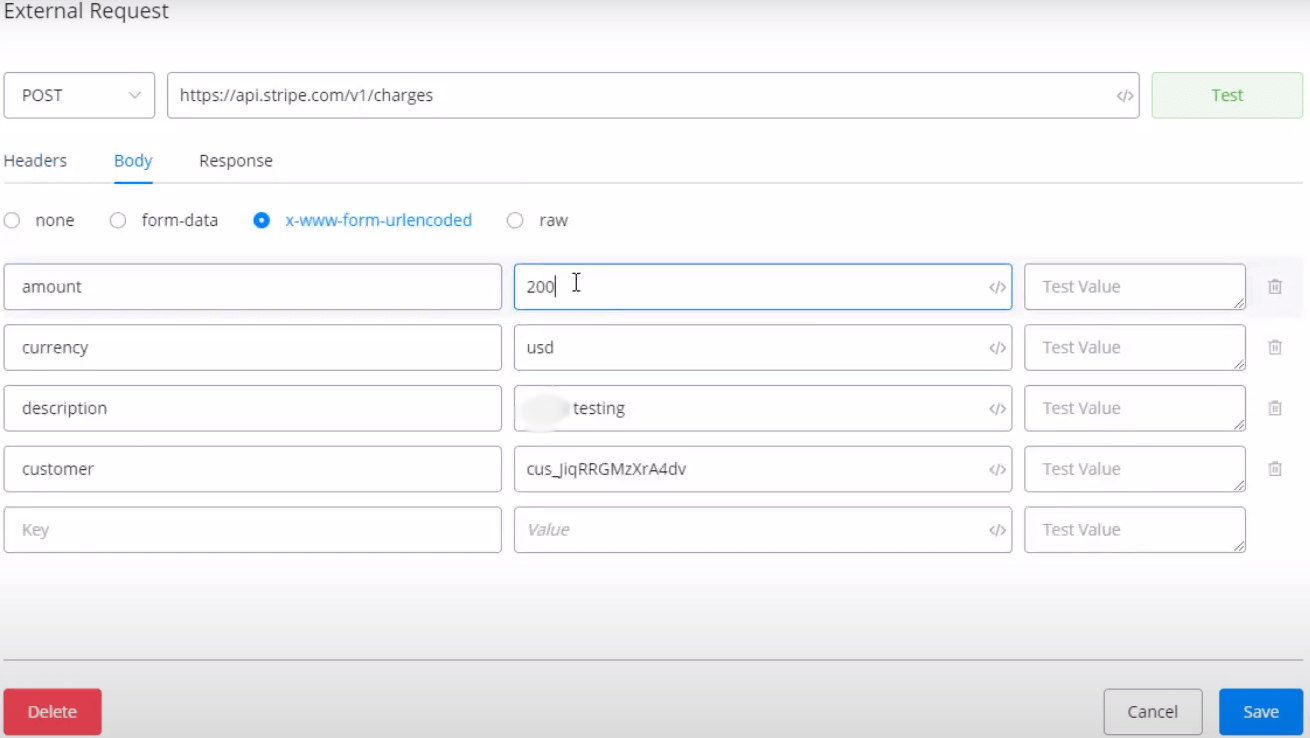
After hitting the test button, this is the response if succeed:
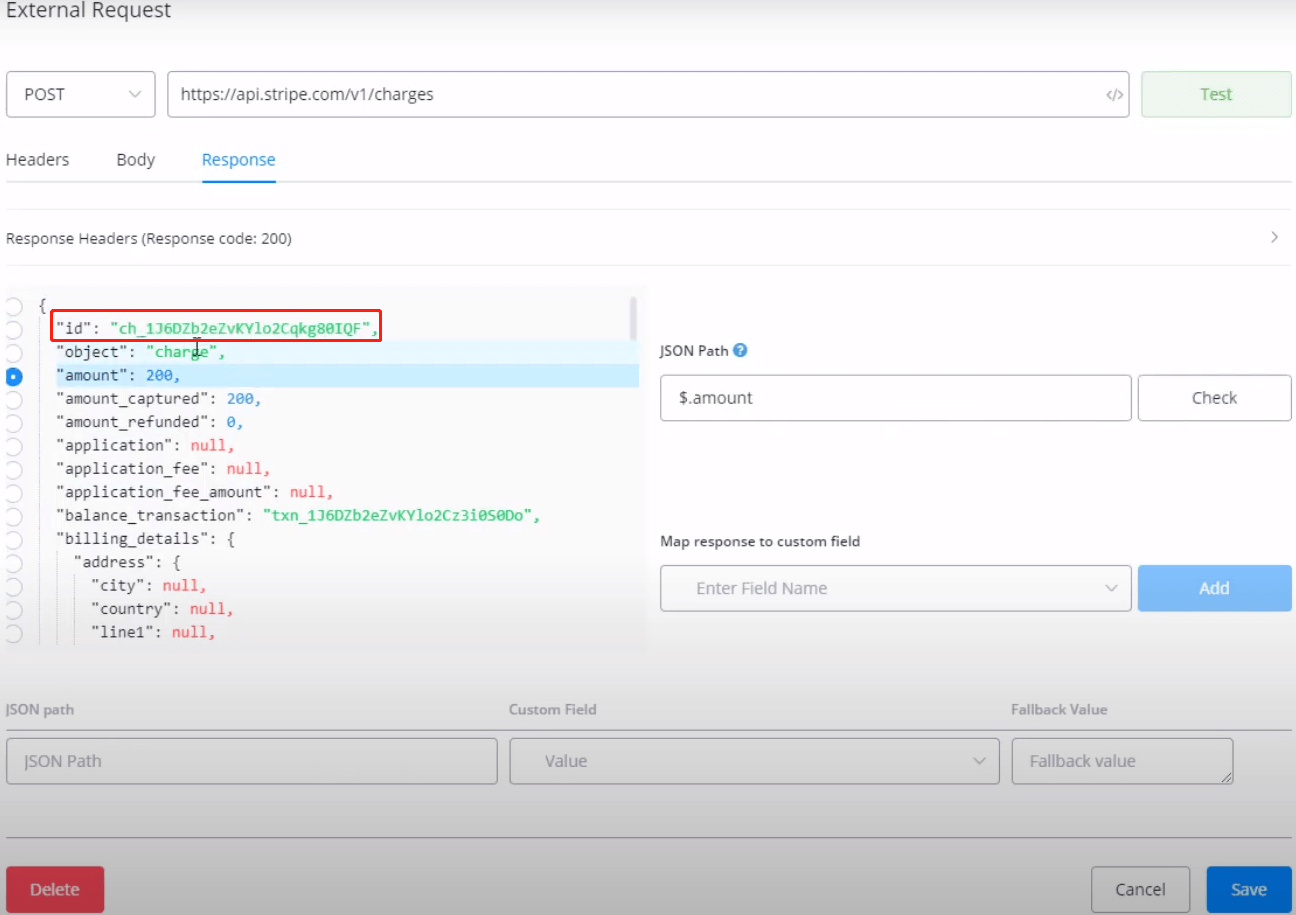
In the response you can see there is an id started with "ch_", which is the payment confirmation code. That means, you've successfully made a payment.
# Description
"Description" is submitted along with the payment details. For example, you can put “Payment of $20.52 submitted from Phone Number (xxx)-xxx-xxxx” to create a record to show which call created the payment.
# A Credit Card for Testing
Use the following card details for testing if needed:
Credit card number: 4242 4242 4242 4242
Expiry date (MM/YY): 12 25 (pick a date in the future)
Zip code: 94105
CVC security code: 333

